

Post by chucktuna on Aug 16, 2005 17:07:04 GMT -5
I've been tossing around the idea of replacing the stock shock with one of the BSS offerings, but I think that since my daughter rides it 90% of the time, not only would it be a waste of money, it would ride to stiffly? for her 80+LBs.
So I was at Wallyworld and came across some "Cardinal Red"
spray paint . Cardinal red was the same color as my battery box sticker and it seemed to match the factory RUCKUS stickers very well. And the cap looked close too, so for $2.50, I bought it and went home looking for something to paint on the Ruckus....really.
After ruling out several tacky ideas in my head, the spring popped in my little brain. Looked easy enough, only two bolts hold it on..right.
I already had it off when I decided that I'd take some shots and do a write up, so here you go
Here are the top and bottom mounting bolts. Real straight forward to remove.
The top bolt required me to loosen the seat brackets to slide the bolt all the way out. Also on the plastic flat pan under the seat, I removed the back two bolts so as to have easy access to the top shock mount.


The air box is held on by three 10mm bolts and a few pinch style hose clamps. Here it is pulled out of the way already.

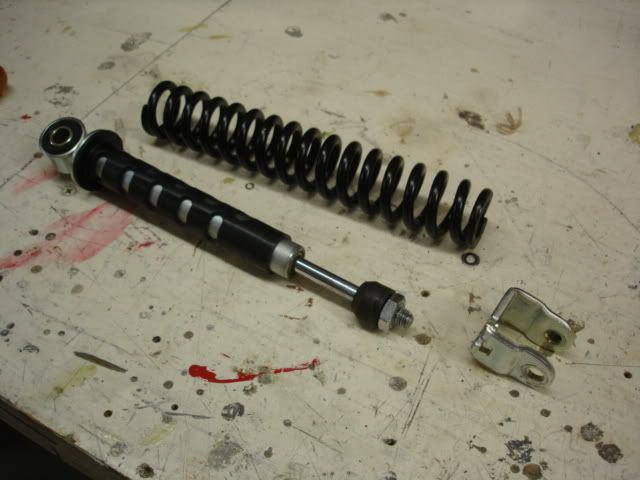
Here is the shock on the bench...massive isn't it? No wonder I bottom this thing out rolling over a soft garden hose

Now comes the hard part and i'm sure there are better ideas to get the spring off, I just didn't want to look for them. A real spring compressor would be the best bet, but I didn't have one so I built one...sort of.
I took two peices of angle iron about 10 inches long and notched them so as to fit betwwen the bottom of the spring and its retainer.
I have a small mill/drill/lathe set up that I used but you could do the same with a hacksaw/file/benchgrinder and some elbow grease.

I put the same notch in both peices of angle iron and used a screwdriver to wedge them between the bottom of the spring and its retainer. Like this.


Now that you have some way to push the spring down off of it's retainer,you'll have to rig a large clamp or vise to squeeze it together. Again, I cheated and used the carrige way to push against the headstock of the lathe, but 2 large woodworking clamps would work also.
Here is a shot of the compressed sping and the now exposed jam nut and retainer/lower shock mount. I also used two C clamps to pinch the angle iron together and keep the spring from slipping past them.

I used a 14 mm wrench and a channelock to seperate the two.

Once the mount/retainer was loose, I released the pressure and out it came.

Since all I wanted to paint was the spring, I set the rest aside and used steel wool to scuff the painted surface of the spring.

A scotchbrite pad would work too, just make sure you work it inside the spring.

Time to paint. I've use this trick lots...the trash can spray booth.
I twisted some thin wire around the end of the spring and hung it from a stick to lay across the can

I actually sprayed it out side and brought it back in to hang under a heat lamp over the trash can. Kind of a cheap bake cycle. But for very small parts you can spray in the can. Here it is with one coat and "baking".

Thats all for now, I'll go put a second coat on and finish this write up later
Chuck
So I was at Wallyworld and came across some "Cardinal Red"
spray paint . Cardinal red was the same color as my battery box sticker and it seemed to match the factory RUCKUS stickers very well. And the cap looked close too, so for $2.50, I bought it and went home looking for something to paint on the Ruckus....really.
After ruling out several tacky ideas in my head, the spring popped in my little brain. Looked easy enough, only two bolts hold it on..right.
I already had it off when I decided that I'd take some shots and do a write up, so here you go
Here are the top and bottom mounting bolts. Real straight forward to remove.
The top bolt required me to loosen the seat brackets to slide the bolt all the way out. Also on the plastic flat pan under the seat, I removed the back two bolts so as to have easy access to the top shock mount.
The air box is held on by three 10mm bolts and a few pinch style hose clamps. Here it is pulled out of the way already.
Here is the shock on the bench...massive isn't it? No wonder I bottom this thing out rolling over a soft garden hose
Now comes the hard part and i'm sure there are better ideas to get the spring off, I just didn't want to look for them. A real spring compressor would be the best bet, but I didn't have one so I built one...sort of.
I took two peices of angle iron about 10 inches long and notched them so as to fit betwwen the bottom of the spring and its retainer.
I have a small mill/drill/lathe set up that I used but you could do the same with a hacksaw/file/benchgrinder and some elbow grease.
I put the same notch in both peices of angle iron and used a screwdriver to wedge them between the bottom of the spring and its retainer. Like this.
Now that you have some way to push the spring down off of it's retainer,you'll have to rig a large clamp or vise to squeeze it together. Again, I cheated and used the carrige way to push against the headstock of the lathe, but 2 large woodworking clamps would work also.
Here is a shot of the compressed sping and the now exposed jam nut and retainer/lower shock mount. I also used two C clamps to pinch the angle iron together and keep the spring from slipping past them.
I used a 14 mm wrench and a channelock to seperate the two.
Once the mount/retainer was loose, I released the pressure and out it came.
Since all I wanted to paint was the spring, I set the rest aside and used steel wool to scuff the painted surface of the spring.
A scotchbrite pad would work too, just make sure you work it inside the spring.
Time to paint. I've use this trick lots...the trash can spray booth.
I twisted some thin wire around the end of the spring and hung it from a stick to lay across the can
I actually sprayed it out side and brought it back in to hang under a heat lamp over the trash can. Kind of a cheap bake cycle. But for very small parts you can spray in the can. Here it is with one coat and "baking".
Thats all for now, I'll go put a second coat on and finish this write up later
Chuck


